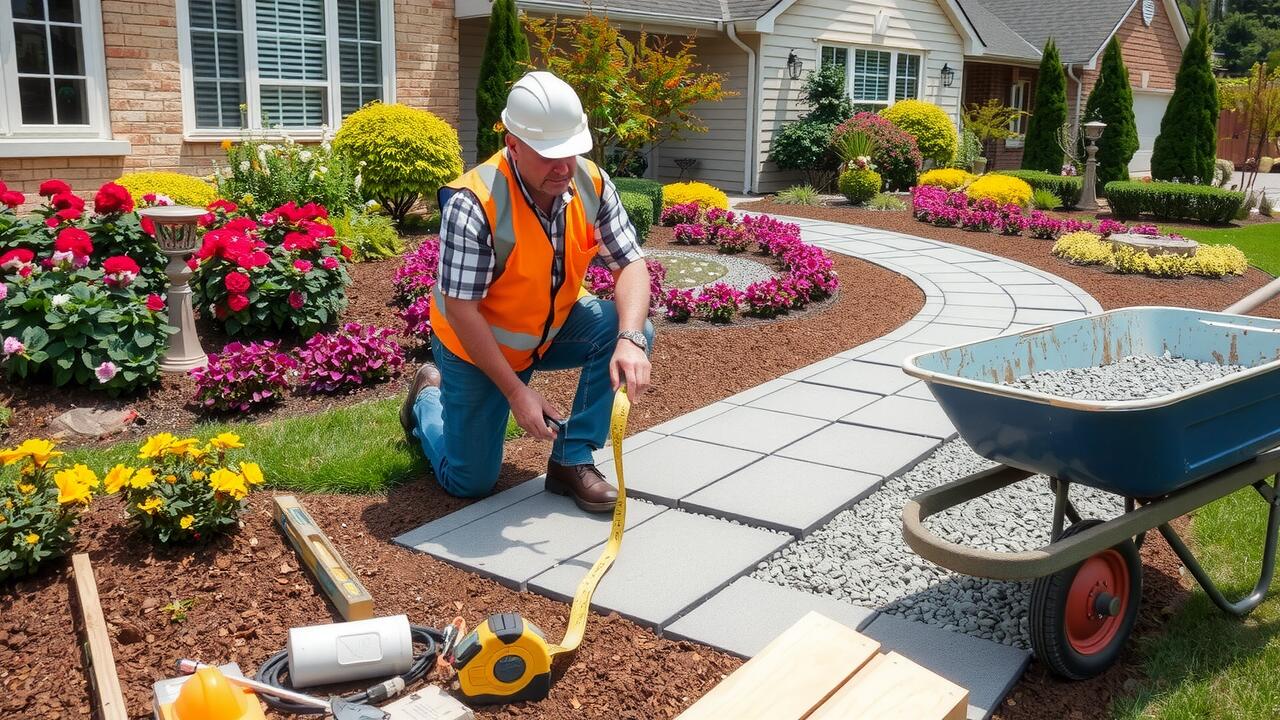
Digging the Trench
Digging the trench is a crucial first step in walkway installation. Begin by marking the area where the walkway will be laid, using stakes and string to outline its edges. The trench should be dug to the appropriate width, typically about 3 to 4 feet, allowing for adequate space to accommodate your chosen materials. Ensure that the depth of the trench is uniform throughout, as inconsistencies can lead to issues during the installation process.
When determining the right depth for the trench, consider the type of walkway materials being used. For most stone or brick walkways, a depth of around 6 to 8 inches is recommended to provide a stable base. This depth will also help prevent shifting or settling of materials over time. Once the trench is dug, check that the sides are straight and that the bottom is level; this preparation is key for a successful walkway installation.
Determining the Right Depth
When planning for walkway installation, determining the right depth of the trench is crucial for ensuring a stable and durable pathway. The general guideline is to dig to a depth of at least 4 to 6 inches, depending on the materials you intend to use. This depth accommodates the base layer and any additional materials while providing sufficient drainage to prevent water accumulation.
In areas with frost or heavy traffic, you may want to consider increasing the depth to enhance stability and longevity. For instance, road base materials may require a deeper trench to effectively support the weight and activity expected on the walkway. Experts often recommend assessing local soil conditions and climate to inform the final depth decision for optimal performance.
Adding a Base Layer
A solid base layer is essential for the longevity and stability of your walkway installation. After digging the trench to the appropriate depth, fill the bottom with a coarse aggregate material, typically crushed stone or gravel. This base layer should adequately support the weight of the walkway materials while ensuring proper drainage. Aim for a thickness of at least 10 to 15 centimetres to provide a sturdy foundation that can withstand regular use over time.
Choosing the right gravel mix is crucial for optimal performance. A blend of larger stones with finer aggregates creates a stable structure that encourages water drainage and prevents settling. When installing the base layer, spread the gravel evenly across the trench. Use a rake to level the surface before proceeding to the next step. Properly preparing this layer contributes significantly to the success of your walkway installation, ensuring it remains functional and visually appealing for years to come.
Choosing the Appropriate Gravel Mix
Selecting the right gravel mix is crucial for a successful walkway installation. The type of gravel used will affect both the stability and drainage of the pathway. Common options include crushed stone, limestone, and granite. Crushed stone is often preferred for its uniform shape, making it easy to compact and forming a solid base. Limestone offers a natural look and provides good drainage, while granite is durable and able to withstand heavy foot traffic. Consider the local climate and the anticipated usage when choosing the gravel mix to ensure long-lasting results.
In addition to aesthetics, the size of the gravel stones plays a significant role in the overall functionality of the walkway. A mix of different sizes can improve stability and promote better water drainage. Larger stones provide a solid foundation, while smaller stones fill the gaps to prevent shifting and settling over time. For optimal performance, aim for a blend that balances both larger and smaller materials, enhancing the support underfoot and helping to maintain the integrity of your walkway installation throughout the seasons.
Compacting the Base
Compacting the base is a crucial step in the walkway installation process. A well-compacted base ensures that the surface remains stable over time, preventing any shifting or settling that could lead to uneven pathways. To achieve the desired density, use a mechanical compactor or a hand tamper, depending on the size of the area being prepared. It’s essential to work in small sections to ensure uniform compaction and avoid leaving any loose or soft spots.
Proper techniques for effective compaction include moistening the gravel before compacting. This slight moisture helps bind the particles together, enhancing the overall stability of the base. Make multiple passes over the area with the compactor, gradually increasing the pressure if necessary. By ensuring a solid and compacted base, the longevity and durability of the walkway installation are significantly improved, minimising future maintenance requirements.
Techniques for Effective Compaction
Proper compaction is crucial for ensuring a stable base during walkway installation. Start by using a plate compactor, which applies even pressure across the surface of the gravel. Make multiple passes, overlapping slightly with each pass to avoid creating low spots. For smaller areas, a hand tamper can be effective. It is important to work systematically, ensuring each section of the base is adequately compacted before moving on to the next.
Monitoring the compaction process helps achieve the desired density. After the initial compaction, check for any soft spots or areas that seem looser than others. If found, re-compacting these sections can help maintain an even and solid surface. Once satisfied with the level of compaction, the area is now ready for the next steps in the walkway installation process, such as laying the chosen materials on top.
FAQS
What tools do I need to prepare the ground for a walkway?
To prepare the ground for a walkway, you will typically need a shovel, a rake, a level, a tamper or plate compactor, and possibly a wheelbarrow for transporting materials.
How deep should I dig the trench for my walkway?
The depth of the trench largely depends on the type of walkway material you plan to use, but a general rule of thumb is to dig at least 4 to 6 inches deep to accommodate the base layer and the walkway material.
What type of gravel mix should I use for the base layer?
A good choice for the gravel mix is a combination of crushed stone and sand, known as ‘road base’ or ‘crushed gravel’, as it provides excellent drainage and stability.
How can I ensure that my base layer is compacted evenly?
To compact the base layer evenly, use a tamper or a plate compactor, making multiple passes in different directions. It’s important to achieve a uniform surface to provide a solid foundation for your walkway.
Can I prepare the ground for a walkway in winter?
While it is possible to prepare the ground for a walkway in winter, the process may be more challenging due to frozen ground. It is recommended to wait for milder weather or use heated tools if necessary.
